We’re back from our 12-day road trip of the Northeastern US. Over the years, we’ve come to believe that the road trip is the best frugal way to travel as a family. Let’s look at how we make our trips memorable (and manageable). Get ready for an adventure as we explore the Keep Thrifty guide to the best family vacation on a budget: the road trip. We’ve used these methods to take our family of five to 46 of the 50 states in the USA over the last 4 years. Through five trips our approximate total cost has been $15000 with a total of 54 days of travel! There’s a lot to pack in, so here’s the outline: 1 Why Road Trip? 2 Budgeting 3 Planning Your Trip 3.1 Picking Your Route 3.2 Driving and Daily Schedules 3.3 Where to Stay 3.4 What to Do - Keeping it Fun and Frugal 3.5 Eating 3.6 Packing 3.7 The Ever-Important Binder 4 During the Trip 4.1 Car Activities 4.2 Screen Time 4.3 Capturing Memories 4.4 Unexpected Changes 5 When You Get Home 6 Creative Options for Low Budgets 7 Closing Why Road Trip? When looking at your options for travel, there’s a clear advantage for families to hit the road over taking a flight. On a plane, you pay for every member of your family individually. Road tripping has the same travel cost whether you’re alone or in a clown car packed to the brim. Our family’s road tripping obsession started with our first trip in 2014. We needed to get from Wisconsin to Arizona and back for my sister-in-law’s wedding. With three kids (aged 3, 2, and 2), we were due to pay for five full-price flights. At the time, that would have been $500 each, totaling $2500. When we researched
We’re back from our 12-day road trip of the Northeastern US. Over the years, we’ve come to believe that the road trip is the best frugal way to travel as a family. Let’s look at how we make our trips memorable (and manageable). Get ready for an adventure as we explore the Keep Thrifty guide to the best family vacation on a budget: the road trip.
We’ve used these methods to take our family of five to 46 of the 50 states in the USA over the last 4 years. Through five trips our approximate total cost has been $15000 with a total of 54 days of travel!
There’s a lot to pack in, so here’s the outline:
- 1 Why Road Trip?
- 2 Budgeting
- 3 Planning Your Trip
- 3.1 Picking Your Route
- 3.2 Driving and Daily Schedules
- 3.3 Where to Stay
- 3.4 What to Do – Keeping it Fun and Frugal
- 3.5 Eating
- 3.6 Packing
- 3.7 The Ever-Important Binder
- 4 During the Trip
- 4.1 Car Activities
- 4.2 Screen Time
- 4.3 Capturing Memories
- 4.4 Unexpected Changes
- 5 When You Get Home
- 6 Creative Options for Low Budgets
- 7 Closing
Why Road Trip?
When looking at your options for travel, there’s a clear advantage for families to hit the road over taking a flight. On a plane, you pay for every member of your family individually. Road tripping has the same travel cost whether you’re alone or in a clown car packed to the brim.
Our family’s road tripping obsession started with our first trip in 2014. We needed to get from Wisconsin to Arizona and back for my sister-in-law’s wedding. With three kids (aged 3, 2, and 2), we were due to pay for five full-price flights. At the time, that would have been $500 each, totaling $2500. When we researched the costs to road trip, we discovered that we could get to Arizona and back for the same $2500 when we included food, gas, hotel stays, and activity costs over nine days of travel.
In the end, the costs were a wash but we were getting much more bang for our buck by hitting the road. Rather than a 4-day vacation with one destination, we got a 12-day trip at a more leisurely pace that included hitting up national parks, zoos, playgrounds, and seeing parts of the country we had never been to.
When flying, the focus of a trip is the destination. When road tripping, the focus is the journey.
We’ve found our experiences on the road to be life-changing – giving us the time and empty space to push outside our comfort zone, tackle new challenges, and dream together (even to the point of drastically improving our marriage).
Sold yet? Ok then – let’s get into the nitty gritty, starting with the budget.
Budgeting
The first step to planning any vacation should be setting a rough total budget. This will help set the guideposts for your trip so it doesn’t become an extravaganza.
For reference, here’s how our five road trips have panned out for costs:
- Wisconsin to Arizona and back
- Length: 12 days
- Cost: $3000
- Note: hotel stays for 3 days of this trip were covered for us as a part of the wedding
- Wisconsin to Gulf Coast, Disney World and back
- Length: 10 days
- Cost: $3000
- Note: this included one full day at Magic Kingdom and Epcot and 3 nights at a Disney resort
- Wisconsin to Pacific Coast of Oregon and back – 12 days – $3500
- Length: 12 days
- Cost: $3500
- Wisconsin to Hilton Head Island, South Carolina and back –
- Length: 8 days
- Cost: $1500
- Wisconsin to Northeast US and back
- Length: 12 days
- Cost: $4000
Start with a preliminary target for your top-limit budget and cut 10% off to cover unplanned expenses. Then, as you go through the planning steps below, keep an eye on how things are rolling up so you can adjust to fit within your limit.
Once you’ve gone on a few trips, you’ll get a feel for average expenses for food, hotels, gas, and activities for your family and budgeting for future trips should get easier.
Beyond this, please follow this fundamental rule:
If you don’t have the money saved up, don’t book the trip.
I can’t emphasize this enough. Going into debt for a vacation is a terrible idea. The interest you pay on debt for that trip will make future trips even harder to go on and put you in a downward spiral. Just don’t do it. If your finances are constrained, check out the last section of this article for some creative options for low budgets.
Planning Your Trip
Once you’ve got your budget set, you can start planning out your trip.
As you go through the process, you may find yourself in a position where things just aren’t working out due to budget, timing, or other constraints. Don’t get bummed out if you get to this point – we’ve had to scrap our first plan for most trips. The second time through goes much faster and you’ll have a better idea of what you absolutely want to keep in your itinerary.
Picking Your Route
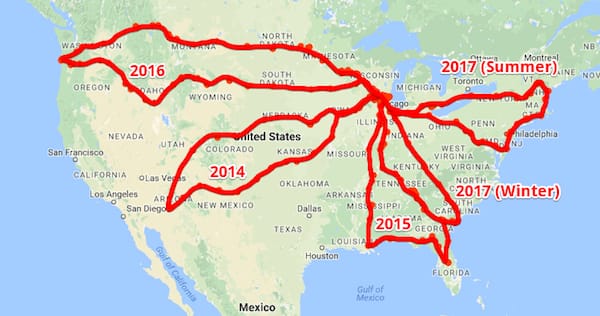
Our routes so far – looks like a Rorschach test to me!
I advise splitting your road trip planning into three segments:
- The departure route
- The destination
- The return route
We plan on a short stay (2-4 days) at a “destination” as a way to break up the trip and give us a location to anchor around. In the past, this has been my sister-in-law’s wedding in Arizona, a stay at Disney World, and nights at a hotel near the beach in Oregon, South Carolina, and Delaware.
To maximize the variety of experiences you have on your trip, build your route as a loop – trying to have as little overlap as possible between your departure and return.
Typically, one side of the loop will be longer than the other, which you can use to your advantage.
We like to front-load our trips, putting the longer portion of the loop first. After the long trip out and time spent at the destination, most of the family is ready to get home. Saving the shorter part of the loop for last helps us keep everyone motivated in the last few days of the trip.
Driving and Daily Schedules
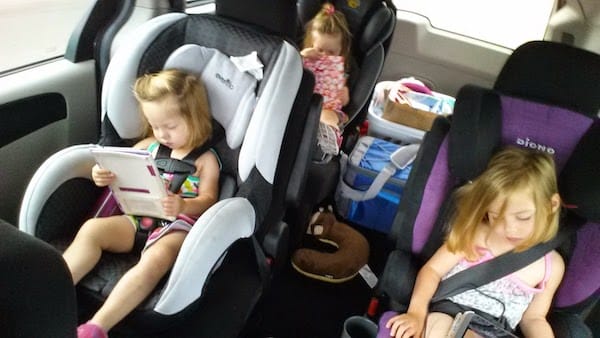
The key to an enjoyable road trip is knowing your family’s preferences and limits and building the trip around those.
Some questions to consider:
- Do your kids sleep well in the car?
- Do they transfer well from the car to bed?
- Are you comfortable driving in the dark?
- When are you most awake and aware for the safest driving?
- How long can you and your kids reasonably keep yourselves entertained while driving?
In all things, err on the side of caution. Remember – the trip isn’t about getting to the destination as fast as possible – it’s about enjoying every step. If you drive less each day but have fun along the way, you’ll have a much happier trip.
After some reflection, build a template of your rough daily schedule. This will help you determine your stops on the days you don’t have something extra special picked out.
Here’s an example from our most recent trip:
- Depart at 9 am
- Driving stretch of 2-3 hours
- Stop for lunch and activity (~1 hour)
- Driving stretch of 1.5-2.5 hours
- Stop for activity (~45 min)
- Driving stretch of 2-3 hours
- Stop for dinner near hotel (~1 hour)
- Drive to hotel (~15 minutes)
- Stop at hotel
In total, we target no more than 7.5 hours of driving a day. We learned this the hard way on our trip to the Pacific Northwest where we were in the car 8-9 hours each day. If you think pushing past your limit on “travel” days will be worth it for getting to your destination sooner, you’re probably wrong. Restless kids and anxious adults make the trip a lot rougher.
Don’t feel obligated to follow the schedule every day; it’s just a guide you can use for some structure. If you find that you need to have a longer driving day one day, shorten the next one. If you plan to spend a day and a half at a national park, figure out what portion of the daily schedule applies.
Finally, here’s a quote to keep in mind as you plan your route:
Thanks to the Interstate Highway System, it is now possible to travel across the country from coast to coast without seeing anything.
Charles Kuralt
There’s a lot of truth to this. Interstate driving in the panhandle of Florida doesn’t feel all that different from Wisconsin. Some of our most memorable stretches of driving have been when we got off the interstate system and took county or state highways instead. In many cases, the route is nearly as fast and much more scenic.
To go a step further, consider searching for “scenic byways” along your route. There are some beautiful stretches of road out there – you just have to find them!
Where to Stay

Where you choose to sleep can have a big impact on your budget. Unless you’re picking cockroach-infested motels, your nightly lodging can easily eat up half of your budget or more.
As you plan out your route, hotel stays are one of the things to pick out first. We’ve found that it’s much easier to pick the place you want to sleep and settle for where you have to eat than the other way around.
Using the daily schedule, you can trace your rough route to see how far you can get each day and pick a few target cities to research for lodging in the area of your daily driving limit.
It’s usually best to book refundable stays just in case. The extra cost over non-refundable ranges from $10-20, but the flexibility can prove to be worth it.
While we haven’t bailed on a full road trip yet, we have changed plans once or twice while we were on the road. Take note of cancellation timelines for each stay and bring the list (along with phone numbers for each hotel) along just in case.
Once you have one or two cities to research, there are a few different strategies for picking your home for the night. Here’s our experience with each:
Cheapest Reasonable Stay
Look for hotels with sufficient spaces for your family members to sleep and keep an eye out for any red flags. Other than that, price is your most important feature for this option. In the area you’re considering, search Google Maps for hotels and check prices for your date. Then use Trip Advisor to check the reviews for each hotel starting with the lowest priced and working your way up.
Rule out anything that violates your family’s must-haves.
We’ve found that this method can save a ton of money but can also be a big gamble. We stayed in a motel in rural Idaho that we didn’t even feel comfortable going shoeless in. Much to our chagrin, one of our kids threw a temper tantrum that evening and was rolling around on the floor under the sink. *cringe*
While there’s merit to this for tight budgets, it’s best if your family is willing to make some sacrifices on comfort. Remember – you get what you pay for.
A Step Above Cheap
Define the nice-to-haves that are most meaningful to your family members. Remember, your lodging is your place to rest and recharge for the next day. There’s nothing wrong with making spending here a priority.
In our case, we have three things we look for in lodging beyond the basics.
First, we only look at hotels with a hot breakfast. At home, our kids have cold cereal six days a week, so a hot breakfast is a special treat. Getting kids up and excited for the day on the road can be tough, but if they love pancakes and breakfast sausage, you have a couple powerful motivators in your pocket. Well – hopefully not in your actual pocket; I’m guessing those grease stains would be tough to get out.
Second, we seek out hotels that have cable (preferably Disney channel). This is ironic because we don’t even have an antenna in our home – let alone cable. Giving our kids the chance to indulge with Disney Junior (and my wife the chance to indulge in HGTV) is a great way to celebrate the end of a day of travel.
Finally, we target find hotels with a pool whenever possible. While we may not use the pool every night, it’s a great option to have at the end of the day if the kids are restless after a day in the car.
With all three of these, the key is that each is a way to make every day a little bit special. This is a critical theme to road trip success. You don’t have to do something grand or amazing every day for that day to be special – the small things alone can be enough to make each day a treat.
Using a Single Hotel Chain
Most recently, we set a new bar for ourselves – picking a single hotel chain and booking exclusively there. This allows us to take the best advantage of rewards programs and gives everyone in the family consistent expectations. You wouldn’t believe the tantrums we experienced when one of the kids was expecting pancakes at breakfast but all the hotel had was waffles 🙂
Rewards points are a big contributor to frugal travel. By gaining rewards on each trip now, we reduce our cost for future trips. For simplicity, we convert our hotel points to miles for our airline rewards program. By the end of our latest road trip, we were earning an extra 10% for our miles from each stay and had received extended check out and priority check-in. These perks aren’t life-changing, but every convenience on the trip helps.
What to Do – Keeping it Fun and Frugal
Once you’ve got an idea of where you’re sleeping, you can move on to planning out your activities. If you insist on covering every touristy attraction while you’re on the road, you’re bound to break your budget and your timeline. Here are some great options for free or frugal activities for the whole family.
Zoos

There are a large number of free zoos throughout the US and every one we’ve been able to visit has been pretty amazing. There’s even one here in Madison, Wisconsin (the Henry Vilas Zoo) that you should definitely visit if you’re in the area.
One of our favorites was a little gem in Emporia, Kansas, the David Traylor Zoo.
If you’ve got a membership to a zoo in your home area, look on your zoo’s website to see if you have access to “reciprocity” on admission fees to other zoos around the country. In many cases, you can get free admission or 50% off!.
Museums
Similar to zoos, there are also lots of free museums you can check out. The same concept of reciprocity applies here as well – if you have a family membership to your local children’s museum, you might find that you can get in free or cheap at other ones around the country.
Beyond the list at the link above, search the cities you’re passing through for “free museum” and you may be surprised at what you find!
Playgrounds

Especially when your kids are younger, this is an awesome staple to put into your road trip activity plan. With a bit of google searching, you can find amazing playgrounds for your kids to stop at regardless of the state you’re in.
Most of the playgrounds we’ve spent time at have far exceeded the quality of options at home. When you add in the “new” factor, your kids will look forward to these stops no matter how many you have on your trip.
In medium or large cities, a quick google search of “best playgrounds” will give you insight into spots that the locals love and that your family probably will too!
Libraries
For some free indoor fun, consider finding local libraries. Beyond taking a few minutes to relax and read, libraries often have play areas and computers with games for the kids to enjoy.
Hiking

Ahhh…hiking. It’s about the simplest free activity you can do, but it also can be incredibly rewarding – especially when you’re traveling the country, seeing new geography your family has never experienced.
We’ve found amazing hikes all over – you can search by state, county, or city and you’re bound to find at least an option or two. If you’re going to go this route, be sure to bring bug spray and remember to check for ticks (and other critters) after you’re done. Also, some hikes are in State or County parks that require admission, so be sure to check park websites ahead of time.
National/State/County/City Parks:
If your route takes you near National Parks, which it almost certainly does, consider opting in for an annual pass and get access to all the parks for the next year. At $80, it’s a steal for the amazing areas you’ll get access to.
Don’t get too zeroed in on National Parks, though – Many of the best attractions in the country are under the jurisdiction of State and County Parks. Admission fees to State and County parks are typically low and the money is used to keep the space up for future visitors. In addition, these parks tend to be less packed with tourists than the National Parks.
Other Options

Sometimes, despite your best efforts, you’ll be out of luck on finding a fun-looking stop in the categories above. In that case, Trip Advisor is your best friend. We found the “Biggest Live Oak Tree” outside of Gainesville, Florida through a Trip Advisor search in the area. It turned out to be an awesome experience – we got some great pictures and watched an industrious tortoise crossing through a huge field.
If all else fails, consider tweaking your trip a bit (drive a little shorter or a little longer) to give you new areas to search.
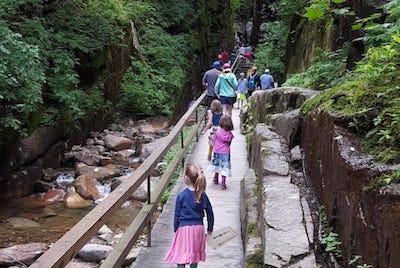
While free and frugal activities are awesome, there are some things that are just worth paying extra for.
As one example, we paid $45 for admission to hike Flume Gorge in New Hampshire (pictured above) but it was worth every penny. We paid $60 to park next to Central Park in New York City for a day and won’t forget the experience of driving in Manhattan and walking around one of the coolest parks in the world.
It’s ok to splurge on some experiences, but don’t overdo it. If you have a couple spendy stops on your trip, you can stay within budget. If you go every day, you’ll bust your budget and you’ll probably be exhausted too – ironically, the paid activities tend to be a lot more packed than the free ones.
Eating
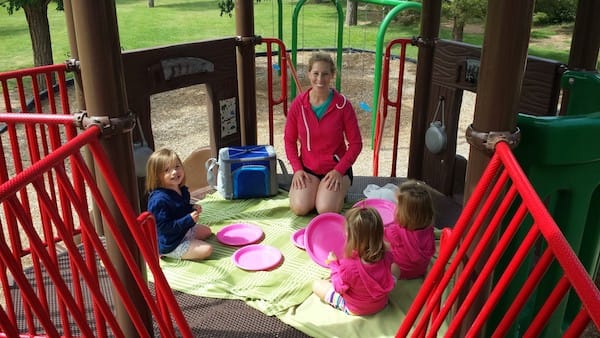
With lodging and activities covered, you’re ready to plan out your meals. Not surprisingly, the advice for keeping your food bill frugal on a road trip sounds the same as you’d hear at home:
Make your own meals. Avoid eating out and treats.
That may be oversimplifying though, so let’s take a look meal-by-meal:
Breakfast
If you followed my advice on staying at a hotel with breakfast provided, you’re good to go here. Every morning can start with hot coffee and a nice meal without worrying about the cost. Bonus – you can often pack these and eat on the road if you need. We’ve been known to stash some bagels and cream cheese and have a mid-morning brunch at an early first stop.
Otherwise, feel free to do what you would at home – pack cereal or oatmeal and a couple small bowls and spoons. Many hotels will have hot water available at breakfast time, but it’s best to check ahead.
Lunch
Making your own lunches on the road can be easy, healthy, and kind to your budget. We focus on minimizing foods that need refrigeration by having peanut butter sandwiches as our daily lunch staple. With a small cooler, we can add some fruit in the mix and have a lunch everyone can be happy with. In addition, leftovers from the previous day’s dinner are great for your picky eaters.
Rather than packing food for the whole trip at once, build in a short grocery store trip every 2-3 days of your trip so you can re-stock. You can find grocery stores in most main cities. If there isn’t one in your town, there’s almost certainly one on the way to your hotel on your way to your first stop the next day.
Pack a sharp knife, a small bottle of dish soap, and a rag so you can cut fruit for yourself at your hotel. No need to pay those ridiculous markups for pre-cut fruit.
We bring a small cooler bag to keep fruit or other items cool during the day and pack with reusable ice packs (that we re-freeze every night in the hotel mini-fridge).
Consider pairing your lunches with an outdoor activity stop. Most playground spaces have picnic tables. If not, you can sit and eat on the playground equipment itself!
Dinner
As a matter of convenience (and as a part of making the trip special), we eat out for every dinner on our trip. That said, we’re not going over-the-top to glamorous sit-down places with “atmosphere”.
Search for restaurants that are quick and can get a full family of five fed for $40 or less, after tax. Based on our kids’ ages, we only choose restaurants that have a kids menu. I know that “Fancy Jack’s Market and Eatery” may have macaroni and cheese on the menu, but if it’s not in the kids section, it’s probably not the kind of mac and cheese your kids are going to actually eat.
Beyond the “fast-casual” chains, you can usually find good success with a couple different options:
Pizza – the local pizza place is a great way to experience how pies are made in different parts of the country. Skip delivery and pick it up after your spouse and kids have checked into the hotel. You can save a few bucks and everyone can enjoy eating in a quiet, comfortable space
Mexican restaurants – often servings are al a carte, meaning you can scale your meal to what you’re actually hungry for. No need to get that fourth taco if you’re not going to eat it.
One final piece of advice here – picking restaurants is a great area of your trip to have your kids help plan. Find a few options in the area and let one of your kids pick the joint. They’ll be excited to be a part of the process and will eat like champs when they’re there.
Snacks and Treats
As a parent, one of my biggest pet peeves is uneaten food – especially food that I paid for. Three orders of uneaten fancypants mac and cheese do not make for a happy dad.
OK, yes, I’ve got issues with our experiences ordering mac and cheese on the road. Cut me some slack – I’m working on it 🙂
We avoid snacks during our drive time – encouraging the kids to eat all their food during meal time. This saves us from messes in the car as well as keeps my frustration level low when we’re out for dinner.
We typically use one treat a day as an incentive for good behavior on the trip. The best option here tends to be desert, as it can ensure that the kids have finished their dinner first. Missing out on ice cream is a mistake most kids will only make once per trip.
Water
It’s important to keep hydrated no matter where you are, but even more so on the road.
Don’t get sucked into the expensive habit of buying $2 water bottles from the gas station. Bring reusable water bottles (preferably metal or rubber-coated glass) that you can fill during your stops. Fill these before you check out in the morning and refill as necessary at rest stops, playground drinking fountains, and restaurants.
Packing
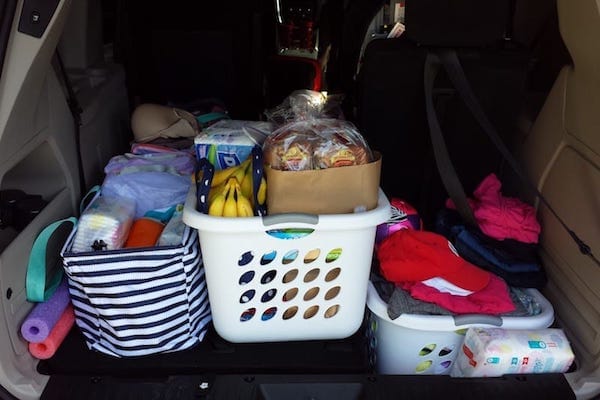
Just because your minivan has a ton of storage space doesn’t mean you need to test the limits on your trip. As minimalists, you should expect that we apply minimalist principles to our road trips the same way we approach our life at home.
By packing light, we reduce the number of things we need to haul, the number of things we need to take care of, and the number of things we can lose. All of this keeps our stress low.
With a few tweaks to your mentality and the right tools, you can avoid those ginormous suitcase carts at the hotel and zip up to your room without an issue.
Tactic 1: Plan for Laundry
We’d likely get hernias trying to haul around suitcases with twelve days worth of clothes for five people on our trips.
Instead, we pack enough clothes to cover 3-4 days of warm weather and a pair of pants and a sweatshirt in case we encounter any cold days. We plan to do laundry every 2-3 days on the trip – at our hotel. If you’re going this route, make sure your hotel has laundry. You can even call ahead and request a room on the same floor as the laundry machines to make life a bit easier.
While doing laundry on your trip takes time, it’s usually something that can be done in the evening without much hassle while cuddling up and watching a movie together as a family. This saves us from so much extra hassle and cuts the number of bags we need to handle by 75%.
Most hotel laundry machines are coin-operated, so make sure to pack quarters or have cash on-hand to get change at the hotel.
Tactic 2: Use Organizing Bags
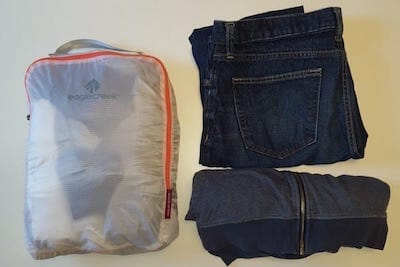
If you haven’t used organizing bags to pack, you’ve been missing out. Before our first trip, my wife bought some bags from Eagle Creek and we use them every time we travel.
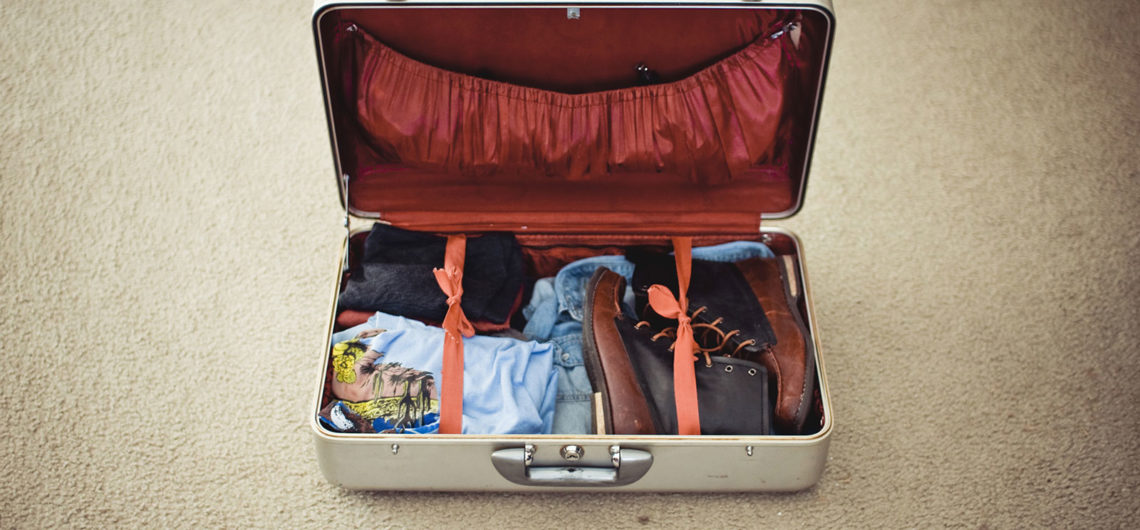
Each family member gets one bag and all of their clothes must fit. Because the bags compress the clothes tightly (and we roll our clothes to save space as well), you can easily fit 3-4 days worth of clothing in a really small space. You can see what we packed for me on our latest trip in the picture above.
In addition, consider what you can and can’t re-wear on your trip to save on laundry costs. Wearing shorts and t-shirts twice is probably just fine. Re-wearing underwear and socks, on the other hand, is an effective way to alienate your spouse and kids that have to spend 8 hours that day in the car with you.
Tactic 3: Everyone Gets a Backpack
By giving everyone a single backpack with their own clothing and personal items, you can have everyone chip in on getting their stuff up and back from the hotel room.
No more shuffling and digging through every suitcase to find Jimmy’s swimsuit.
The kids are responsible for their own packs, which contain their clothes, tablets, blankets, and any toys or stuffed animals they want to bring on the trip. We didn’t do this until our kids were a bit older, but now that they are all 5+, this is an absolute Godsend.
Tactic 4: Toiletries Bag
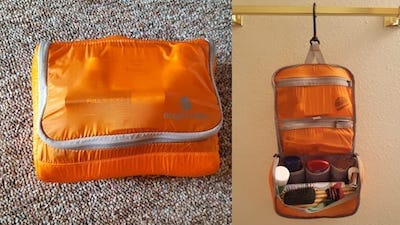
Similar to the organizing bags, we purchased a toiletries bag that not only serves a purpose on our trips – we actually use it day-to-day at home.
We can fit toothbrushes, travel toothpaste, deodorant, hair gel, shampoo, conditioner, and more in one little pack.
Tactic 5: If You Don’t Need It, Leave It (in the car)
Think before you haul everything upstairs.
As an example, we usually have a laundry basket we bring along full of towels and swimming gear. If we’re not using the pool that night, why waste the energy hauling it upstairs?
If we change our minds later, I can always run back down and grab it.
Tactic 6: If You Don’t Need It, Leave It (at home)
Consider whether you really need each item you’re bringing along. Every item is another thing to keep track of and to haul. If you can get by without it, you’ll have more freedom on your trip and can focus more on enjoying your experiences.
As an example, I used to bring my electric razor along on the trip but quickly realized that I could leave it home if I just shaved the day before we left and felt comfortable sporting a bit of a beard throughout the trip (spoiler: I most certainly am).
The Ever-Important Binder
This is the last big piece of preparation but possibly the most important – the binder.
Before your trip, look up directions for each stop and print them out; organize these into a three-ring binder with dividers for each day of travel. You should also print any hotel confirmations or other reservations you’ve made and put them here as well.
Finally, get a sleeve that can go in the binder to hold any receipts. You’ll want to track your spending to help plan for future trips. If you don’t want to get paper receipts, you can just log your expenses on your phone using Thrifty
We also usually check out a copy of the latest road atlas from our library system for our trip just in case. Google’s directions are great for getting you in the area, but you never know what can happen. If you’re lost in the middle of nowhere without a cell signal, having an old-fashioned map is a big help!
During the Trip
Awesome job getting this far! Your bags are packed, the gas tank is full and everyone’s ready to get on the road! Now it’s time for some thoughts about what you’ll encounter on your journey.
Car Activities
Eight hours in a metal box with other people may seem more like a horror movie plot than a fun trip . Handled properly, however, these hours can be an awesome time to bond as a family and create fun memories together.
Here are some ideas for keeping entertained while in the car:
- Audiobooks that the family can enjoy (especially if you can rent them from the library)
- The Alphabet Game
- Hum songs and have everyone else guess what the song is
- Car Bingo
- License plate game (finding license plates from as many states as possible)
- Celebrating each time you cross into a new state
- Talking. I’m not joking 🙂 How often do you get time that you can seriously sit and focus on having a conversation with your family members? My wife and I have used these hours on the road to joke and laugh, get to know each other better, and to dream about our future.
- Books, coloring, and toys – lots of items from home can travel well enough in the car. The time on the road gives your kids great time to work on their imagination.
- And, of course, screen time. This one’s big enough that it deserves its own section. Read on.
Screen Time
For our road trips, we bought a Kindle Fire tablet for each of our kids and loaded them with free games and a few purchased movies and TV shows. That said, we don’t want our kids to spend our entire drive time staring at their screens.
With that in mind, here are two rules to consider for screen time:
- Designate times during the day where tablets/phones/computers/etc will be either “absolutely available”, “absolutely unavailable”, and “negotiable based on behavior”. We use these, in order, for our morning stretch, our post-lunch stretch, and our last leg of the day.
- Once batteries die, the screens stay off until the next morning. We charge tablets every night but have stopped trying to work out charging in the car. Invariably you’ll end up with one more dead device than however many portable chargers you brought with anyway.
In addition, headphones (with volume limiters) are highly encouraged to help Mom and Dad have some amount of quiet time during the drive.
Capturing Memories
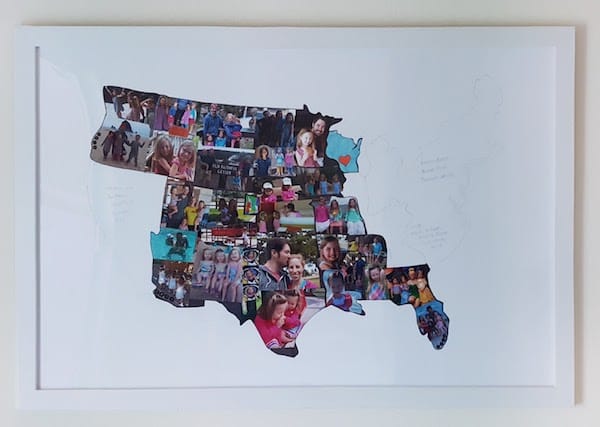
Let’s face it – souvenirs are expensive. Marketers are great at charging you not just for the cost of the item, but for the sentimental attachment they know you’ll have.
The best used sentimental items are those that are proudly on display that you can enjoy every day. With that in mind, my wife came up with the idea for a memory map, where we fill in the states we’ve visited with pictures from each road trip as we get there. The image above doesn’t have the pictures from our two most recent trips in yet, but I expect we’ll get them put together in the next few months.
Make sure to take lots of pictures on your trip. In particular, focus on pictures of your family (candid shots are my favorite) instead of just the scenery. It’s the moments you experience together that you’ll really appreciate.
Unexpected Changes
Despite all of your best plans, you are bound to have some hiccups along the way. We’ve experienced multi-hour detours, a foggy day at Mount Rushmore, and three kids with walking pneumonia on our travels.
The key here is to remember that you’re not in control and that’s ok. Make the best of the situation and soldier on. If there’s rain for your lunch stop, eat in the car. If one of the kids is really sick, breeze through your other stops and get to the hotel so they can get some rest. If your kids are all sleeping when you’re due to take an afternoon break, it’s ok to keep driving and enjoy the quiet 🙂
When You Get Home
If you have a great trip but return home to stress and chaos, you’re going to put a damper on your excitement for the next trip. Here are a couple critical things to keep in mind once you get home:
- Plan to take 1-2 days off after your trip to recover and get back into your normal routine. We often plan to get back home on a Friday so we’ll have the weekend to recover before Monday hits.
- While you’ll all likely be happy to be home, expect that your kids (and you for that matter) may take some time to re-adjust. Find some fun things to do as a family in the first couple days home to keep the fun from your trip going.
Creative Options For Low Budgets
Maybe your budget is a bit tighter or you’re just looking for something different. Here are three ideas to help your budget while keeping the road trip spirit alive:
- Mix in Camping – For those that are outdoorsy, this can be a great way to cut costs – camp sites are significantly cheaper than hotel stays. Make sure to book extra time in your day for tent set-up and tear-down as well as space in your car to pack all the extra gear.
- Friends and Family Tour – if you’ve got friends and family around the country, make them a part of your trip! Ask if you can stay the night – you’ll get to build them into your road trip experience and build your relationships as well.
- The Ultimate Staycation – if you’re looking to keep your budget super-low, this is a great way to go. Plan a “road trip” where you end every night at your home. Build driving loops for each day, exploring the awesome things within a few hours of your house. Once you start searching, you’ll be surprised at all the cool things you can find to do in your own state. We’re planning on doing this next summer as we work on saving up for our trips to Alaska, Hawaii, California, and Nevada.
Closing
Well, if it wasn’t obvious before, it should be now: we think road tripping is the best way to vacation on a budget. There’s certainly work to be done in the planning process, but the planning process itself is part of what makes road tripping fun. Next time you’re thinking about a family vacation, give road tripping a shot – you’d be amazed at how awesome it can be.
When you do hit the road, keep thrifty and keep safe!
That’s our approach to having the best family vacation on a budget. It’s worked fairly well for us over the years and we’ve got the memories to prove it 🙂 What tips do you have for traveling as a family on a budget?
written by Chris


